Friday, September 20, 2013

Customize Your iPhone with Cocoppa!

I'm a huge fan of making everything I know pretty and my phone is one of those things.  I spent way too much time today messing around with this app called Cocoppa that you can get in the App Store for free right here!  I have seen a good amount of people say that using this app has caused problems for their phone. I used it with iOS 6 and had no problems.  I have been using it with iOS 7 and my phone is still fine.  It may just end up that it depends on how often you use your custom buttons, which I will explain below.  The one major issue I had was that there are so many ads on the app that it kept opening Safari pages if I didn't click the right places so just be super careful.  It occasionally quit the app too which was also annoying.  I admittedly un/reinstalled this app probably 10 times last night because I was so frustrated with it.


✿ Introduction ✿

There are a few things that I should clarify before explaining how to do it.  Now, what this app actually does is create shortcuts to your apps, not replace the button that is already on your phone.  What the Cocoppa buttons on your phone actually do is open Safari which then redirects to your phone app so it's more of a shortcut.  This means a couple things.

First, it ends up using a bit of battery power because it opens two apps instead of one.  Second, you have to keep all your original icons.  I choose to hide them in a folder on the next page but keep out the most important ones in case I am trying to save battery power by not opening the extra app (Safari) every time I click a button on my home screen.  Because it goes through Safari, it doesn't work with some of your phone apps, specifically text messaging and your actual phone (aka the reason any of us own a phone anyway which is to make calls).  You do have the option to create a shortcut for a button to call, text, or email a specific person.  You can get around this if you use another app for messaging, such as Line, What'sapp or Kik or another email application.  I personally use Gmail because the preset mail app doesn't load my messages as well.  I also just set my messaging icon to go to text my boyfriend, but you can obviously just click the back button to go to your inbox.  So basically, it looks really cute but it's a bit impractical.  Your choice to use the app depends on your opinion of design vs functionality.


Cocoppa comes with a lot of user created content that is all free for you to choose from.  There are also many categories you can search through.  The above image is one I pulled from Google which is a pretty good sample of some of the super cute icons (and wallpapers) you can find on the app by searching through themes and user profiles.  There are some different kinds of icons that I have seen.  Some are random illustrations, some of which are created in a set by a user, often with a matching wallpaper and lock screen. Others are made to look similar to the original app icon but in different colors.


✿ Using Free Icons ✿

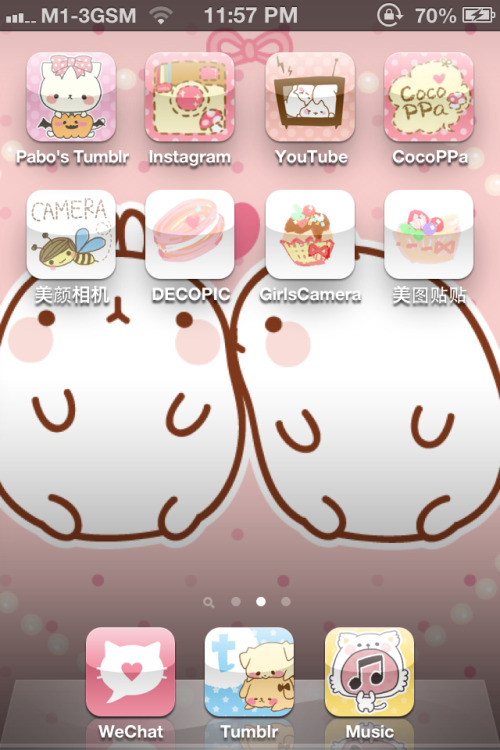
This is actually how my phone was with iOS 6.  I only did a couple icons for my front home screen that were all kind of random on the bottom part.  I got all those icons from the app.  I feel like it's pretty self-explanatory and easy to figure out on your own.  If you have any questions, just comment and ask me.  Once you select the one you like, it will guide you through the set-up.  All you have to do is click "okay" a couple times and it works.


The image above is how my phone looks now.  I made all these icons myself using artwork by Junko Mizuno which was really easy to do.  First I chose the wallpaper and set that the regular way you do that on your phone.  I'm assuming everyone knows how to do that.  There really isn't any in-app explanation for how to make them but I figured it out myself.  First, download the Cocoppa app from the App Store.  Then register an account.  It's easy to do through Twitter.  Facebook wasn't working for me.

To create the icons, go to the Cocoppa website on your computer and log into your account.  I chose to use my computer because I felt it was easier to do it this way.  Because my wallpaper was by artist Junko Mizuno, I chose a bunch of other images by the same artist and saved them to my computer.  Then I chose to upload them individually on the Cocoppa site to create icons.  I was confused because I initially though I had to make them that shape and size prior to uploading, but the website, and I suppose the app as well, let you crop the icons to your preference.

This is important:  You have the option to list your icons for public use but you can only do this if the images are your original artwork meaning not something you found on Google, not something by another artist, etc.  But you can still make icons out of other people's work for your personal use.  You just have to make them private.

So anyway, save all the images you want to your computer and upload and crop them on the Cocoppa website. I had made a mental list of my most used apps so I had an idea of how many icons I wanted to make.  I ended up making some extra so I had a choice when it came to aesthetics.  After you have all your icons cropped and created, open the app on your phone and go to your profile where you will have the option to search your private, self-created icons and install them following the instructions!

I really like the way mine looks with the consistent theme and almost wish I had another phone to customize.  I hope this guide was helpful in explaining this application to you.  If you have any questions, feel free to contact me and if you use the app, I would love to see what your phone looks like!

Twitter ✿ Instagram ✿ Etc.

Thursday, September 19, 2013

Magical Girl Gang: Sheinside Creamy Mami Jacket Review

I admittedly hadn't started watching Creamy Mami until recently.  I always thought it was cute but I finally began watching in within the past few months and I love it.  So of course I had to get this jacket with birthday money as soon as possible.  I had never ordered from Sheinside before but I thought it would be okay because I know a lot of bloggers work with them.  I'm not one of those bloggers so my opinion is not at all related to their company because  I bought their product myself and it wasn't provided for free from them.  The website is a little strange because it seems like they buy a lot of items in bulk of Taobao, saving you the trouble of using a shopping service.  The issue is that a lot of artwork isn't licensed, somethings are knock offs or stolen work entirely.  I did my fair share of research before purchasing this jacket, trying to see if the artwork was stolen aside from the character in general.  I could not find this product or graphics created by anyone else.  Maybe it's not an officially licensed product, but I can't find any evidence that the artwork or design were stolen, unlike some of the Galaxxxy items on their website.

I chose the pink one but they are both super cute.  The graphics are exactly the same. It's only the sleeve and trim colors that vary between the two.  It's priced at $25.41 and Sheinside offers free shipping and order tracking on all orders which is always a plus.  You also get 20% off your first order so remember to use that with your purchase!  I used it and so the jacket and free shipping ended up being $21.60 total.  They also have a point system that awards you points for every order that you can use towards other purchases.

The one thing about Sheinside is that you have to buy it with Paypal and can't just type your credit card information into the website.  I had to make sure I had Paypal set up with my bank account because when I only had it connected to my card, it was charging me a fee!

I placed the order on August 30th and it got to me 6 business days later on September 9th.  Not bad for free shipping from China.  Here are two shots of the mailer it came in plus the little bag that it was packaged in.


It's really cute that they put my order in the ziplock bag but it was kind of smushed up in there so it ended up being a bit wrinkled when I took it out.  The instructions said to hang it in a warm place to get out all the wrinkles, but I guess my closet wasn't warm enough.  Maybe I will hang it outside on a warm day and see what happens. For now it's still a bit wrinkled but it's not that bad really.


The graphic on the back is a little blurry but I feel like it's not so bad because it kind of adds to the ~dreamy~ aesthetic.


As someone who has sewing experience, I can tell you that this product is very well made.  There weren't any loose ends and all the edges are well finished etc.  It really doesn't feel like it's going to fall apart.


The jacket is lined with this mesh type material and the outside part of the jacket is a very thin material.  The neckline and the ends of the sleeves are similar to those of a sweater.  It's very much like a sport jacket but way cuter.  It won't keep you too warm on its own but it's good for fall or layered over a cardigan.

I have some photos of myself in the jacket just for reference.  The jacket is one size only and since I am usually a small or 2-4, it looks rather large on me.  I'm also 5'5" ish so it's kind of long and reaches my butt, just to give a size reference.  I took these photos with self-timer in my back yard and while I have mastered using my camera to take photos of other people, I haven't quite got it for photographing myself so forgive me if they're a little silly looking.


This isn't so much an outfit post as it is a review but if anyone is curious:

Top: Sailor Moon tank given to me by one of my sister's old friends
Skirt: American Apparel
Socks: Uniqlo
Shoes: BDG by Urban Outfitters
Hair Clip: Bought in Harajuku

In summary, I would rate this a 4.5 out of 5.
The shipping was super fast, the quality is pretty good but my only complaint was how it wasn't that nicely folded when it was shipped so it's a bit wrinkled.

Please feel free to leave a comment if you have any questions.  I hope this helps!